How to Add Business Mail to iPhone Mail App
For business professionals, having access to email on the go is essential. The iPhone’s Mail app allows you to integrate your business email for quick and easy access. In this guide, we will walk you through the steps of logging into your business mail account in the Mail app on your iPhone. Whether you’re using an email hosted with NybbleHost or another provider, this guide will ensure a seamless setup.
Why Set Up Your Business Email on the iPhone Mail App?
- Quick Access: Manage your emails directly from your iPhone without logging in to a separate browser.
- Stay Connected: Respond to important emails on the go.
- Sync Across Devices: Sync your emails, contacts, and calendars for smooth work integration.
- Enhanced Productivity: Access all your business communications in one place, improving efficiency.
Complete Process—How to Log in to Your Business Email in the iPhone Mail App
Step 1: Open the Settings App
Begin by opening the Settings app on your iPhone. Scroll down until you see Mail and tap on it.
Example Image: Settings Icon on iPhone
Step 2: Add a New Account
Under the Mail section, tap on Accounts, and then select Add Account.
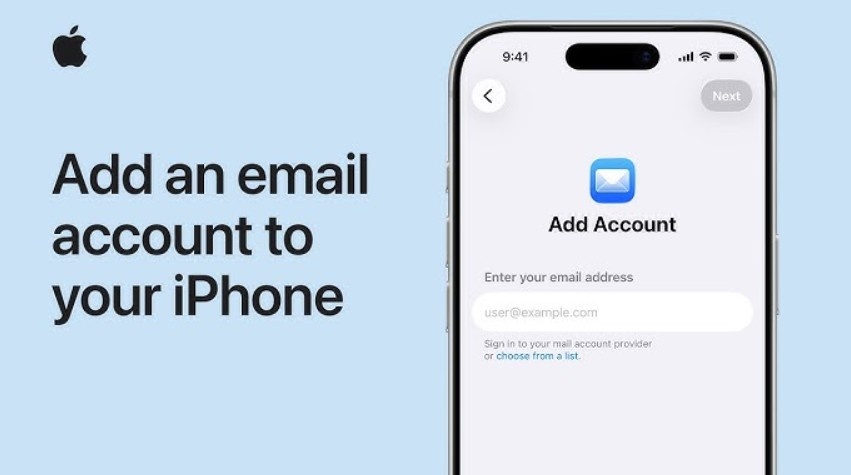
Step 3: Choose Your Email Provider
You will be presented with a list of popular email providers. If your business email is hosted by one of the listed providers (e.g., Google, Yahoo, Outlook), select the corresponding option. If your business email is not listed or is hosted through a service like Nybble Host, tap on Other.
Example Image: Add New Mail Account Screen
Step 4: Enter Your Business Email Information
- Name: Enter the name you want your recipients to see.
- Email: Type in your full business email address (e.g., you@yourbusiness.com).
- Password: Enter your email account password.
- Description: Provide a description to easily identify this account (e.g., “Business Mail”).
Tap Next to continue.
Step 5: Manually Enter Email Server Information (For Custom Providers)
If you selected Other for a custom email provider, you will need to enter your incoming and outgoing mail server details.
- Incoming Mail Server:
- Host Name: Enter the incoming server provided by your hosting service (e.g., mail.yourbusiness.com).
- Username: Your full email address.
- Password: The email password.
- Outgoing Mail Server:
- Host Name: Enter the outgoing server (SMTP) provided by your hosting service (e.g., smtp.yourbusiness.com).
- Username: Your full email address.
- Password: The email password.
Make sure all details are entered correctly and tap Next.
Step 6: Complete the Setup
After your iPhone verifies the information, you’ll have the option to sync additional features like Mail, Contacts, and Calendars. Enable these options if needed, and tap Save to complete the process.
Common Issues and Solutions
- Incorrect Password or Username: Double-check your login credentials if you encounter errors.
- Server Errors: Ensure you have the correct incoming and outgoing server settings. You can contact your email host (e.g., NybbleHost) for the exact details.
- SSL/TLS Settings: Make sure the SSL/TLS options are correctly enabled to secure your email.
Why Choose NybbleHost for Business Email Hosting?
Having reliable email hosting is essential for smooth communication and professional presentation. With NybbleHost, you can ensure secure and reliable business email hosting with top-notch customer support and fast response times.
- 99.9% Uptime: Never miss an important email due to server downtime.
- Fast Customer Support: Get help whenever you need it.
- Secure Hosting: Protect your sensitive business communications with advanced security features.
Upgrade Your Hosting with Nybble Host Today!
Ready to streamline your business communications with secure and reliable email hosting? Check out Nybble Host’s hosting plans for robust performance and seamless email management. Whether you need basic web hosting or advanced email hosting, NybbleHost has you covered.
👉 Get Started with Nybble Host
Visit Nybble Host and explore our hosting solutions to enhance your business email experience.
Conclusion
Setting up your business email on the iPhone Mail app is a simple process that ensures you stay connected and productive on the go. By following this step-by-step guide, you’ll be able to integrate your business email seamlessly into your iPhone’s native Mail app. For the best experience, ensure your business email is hosted with a reliable service like NybbleHost, which guarantees uptime, security, and fast support.